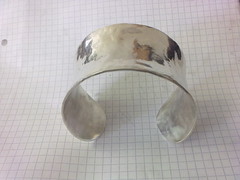
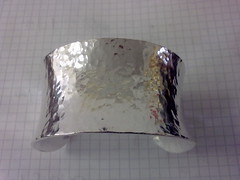
We received a commission from a customer for an anticlastic bangle. It’s not something I’ve made before. Fortunately, we do have an appropriate rounded mallet, made from lignum vitae, but I had to make some wooden stakes to form the bangle on. Raising is an important skill for the medieval period, and most bowls and cups would be made this way – spinning may have been practiced before the introduction of steam power, and later, the electric motor, but it’s use would be limited. Due to cost and time, I won’t be making this bangle as it would have been made in the middle ages, but the fundamentals are the same. The finished bangle is pictured left, and the process of making it is described below.
Many of the readers on Ganoksin will be far better aquainted with raising than I am, but for those that don’t know, the terms “anticlastic” and “synclastic” refer to the direction of the curved axes of an object. An example of a synclastic object would be a bowl, whereas the bangle in this article is anticlastic, having a sort of saddle shape. For an illustrated description of these terms, and proper tools and technique for anticlastic raising, check out this excerpt from Tim McCreight’s book Complete Metalsmith

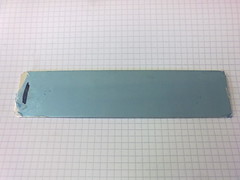
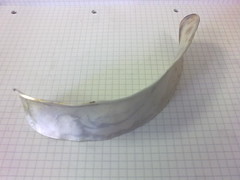
Pictured above right is the sterling silver sheet that was purchased for the job. It still has it’s plastic cover on – I kept this on for the first round of hammering, but it had to be removed after that for annealling. I started by rounding of the edges of the sheet, to make the bangle attractive and easier to get on and off. Due to my circumstances, I wasn’t able to use the method provided by Tim McCreight, which involves bending the sheet into a flat bangle, and then using a sinusoidal stake to give it the saddle shape by curving the short axis. Instead, I was using a hemlock saddle stake (above) which I had made that morning from an old bannister.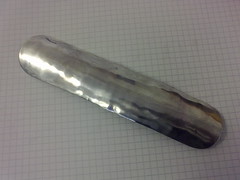 Due to it’s shape, it wasn’t possible to raise the bangle in the right order. Instead, I had to curve the short axis by laying the flat sheet on the saddle stake and beating it with the mallet. I then removed the plastic cover and annealled the silver. At this point, I decided to polish the inside surface of the bangle (pictured right), as it would be harder to get at later. As I was rough-polishing the silver, I just used a steel-cutting composition called Carbrax (which I highly recommend for silver and platinum). Bear in mind that this article is about a job in the modern workshop, not a medieval one, so the item will be polished to a lustre with a jeweller’s lathe and then tumbled in steel shot for a bright finish.
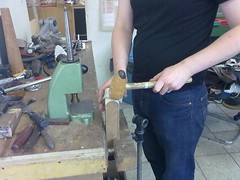
The second stage was bending the curved sheet into a bangle. To do this, I used the saddle stake again, but changed the way the mallet was used. Instead of beating the metal in the middle of the stake, I used the edge, which has a slight anticlastic form itself. This caused the silver to bend. Some work was needed at this stage to stop the edges from deforming too much, (which meant returning to the first stage occasionally),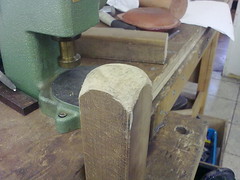 and it did take a couple of passes before the bangle was bent into a semi-circle. The bangle after the first pass is pictured left. Due to the type of stake I was using, I had to change to a wooden bangle mandrel at this point, to turn the semi-circle into a proper circular form. Again, the edges deformed slightly, but this time I was unable to use the saddle stake to smooth them out. Instead, I made another stake, this time a “squared-off” dome (right).
With the dome stake, I was able to gently adjust the edges of the bangle, using the curve of the dome as a guide. Before this, I had been extremely worried about my ability to give the edges a smooth, regular form, but the dome stake was a better solution than I could have hoped for. After that, it was just a matter of making sure the bangle was properly pickled, polished with carbrax and tripoli, and then barrelled. At the time of writing, the piece is still in the barrel, so the image of the finished bangle (top) isn’t at it’s best.
There are several improvements that could be made to the process. First, I would clean up the stakes – they were roughly filed, which left some impressions on the wood. Second, I would reduce the hardness of the mallet and the stakes, with the hope of getting a smoother surface at the end – I’m happy with the bangle, but very agressive abrasion and polishing would be needed to give it mirror finish, which may be what the customer is after. One possibility for the mallet is to use nylon or rawhide, and the stake could be covered with leather. Another option is lead – not a commonly used material now, but very important in the middle ages. A skin of lead could be formed over the stake, and nailed into place, and then a layer placed on top of the silver, to protect it from the mallet; lignum vitae is one of the hardest woods available. In an ideal world, I’d use a sinusoidal stake in metal or wood. The problem with that solution would be mounting it – I’d need to create a special vice to secure the stake. Does anyone know how horizontal stakes are mounted? it’s not something that I’d worried about before now, but I think it could be quite important.
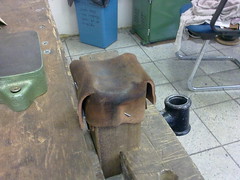
UPDATE: I’ve made a second bangle, which is being hallmarked ATM, so I haven’t got a picture of it. I modified the saddle stake, by gluing and nailing some pigskin on it (right), and then used a sheet of leather between the silver and the mallet. This prevented the dimpled surface of the first bangle (top image), and only a small amount of abrasion was needed to give the bangle a smooth surface, which I’ll hopefully polish to a mirror finish when it comes back from the assay office.
UPDATE: I’ve had a third chance to make one of these bangles – this time in fine silver, which was easier than sterling in some ways, but more effort in others. The planished effect took quite a long time to get right, and I maybe should have done the planishing before curving the bangle (although that might have had it’s own problems, as indentations might be “smudged” in fine silver).
{ 12 comments }
Hi Jamie,
I have a 2 1/2″ vice mounted on my bench, if you put the handle of a mandrel below the jaws , so it rests on the neck of the vice, and tighten up it holds the mandrel at three points around it. You are not supposed to do this, but I have been doing it for 30 years and haven’t broken a vice yet! If the jaws of your vice are too big it will not grip the handle before the jaws are completely closed.
I have not tried this but I do not see why you couldn’t make an anticlastic mandrel out of a plain one heated up red hot and then bent to shape between a couple of vertical rods, I think I saw instructions on how to do this somewhere , can’t remember where now.
kind regards,
Tim Blades.
I made some sinusoidal stakes out of in line punches. I have photos if you want to see them. I’m finishing up some Delrin stakes now (endless filing and forming after initial cutting). Right now I’m using my sinusoidal stakes with Delrin hammers. I was told by my friend who is a goldsmith and studied with Michael Good, to work smarter not harder. (I started with 14 ga. material) LOL. Now I make sure it’s rolled down to 24 gauge. Much easier, and still very sturdy. I have a tutorial on my website. www. capriciouscrowns . com (not sure if I can post a link here so I’ve spaced it out. I love your wooden stakes Helen. I’ve been making some out of ancient barn beam pins, and maple and some pieces of 200 yr. old heart pin planks that are 3″ thick by 12″ wide that were the walls of a Savannah Georgia warehouse on the river. You’ve done a great job and your wooden stakes are amazing.
Regards, Dinah Hoyt Taylor
Tim – thanks for the advice. When I’ve got a decent vice set up, I’ll try that – the one we use now is pretty useless. To make the mandrel, I’d have to wait until I have a furnace. I reckon that the trick with the curves would be achieved by using vertical rods in pairs, differents thicknesses and distances apart (ie. use 1+2, then 2+3, then 3+4).
Dinah – how does that plastic effect the silver? Does it cause much damage to the surface? I had a look at your website – nice collection of stakes and tools. I like your anvil, too. I’ll post up another picture shortly, of a modified saddle stake.
We always appreciate it when someone takes the time to show their method(s). It’s a generous thing to do, and surely says something about the person behind the artist. Thanks for sharing this with us, and by the way, the piece was nice!
Rgds…………Ski & Cathy
Several of our vices have pipe jaws below the standard jaws. They do a beautiful job of holding ring mandrels and sinusoidal stakes. Occasionally we need to use the bigger vice with no pipe jaws, and for that we have a prismatic jaw insert. The prismatic jaws can be had in a number of different configurations, and are awesome for some holding jobs.
Jason
I’ll look out for those – we’ve got a big old vice that needs mounting, and I could probably get some nylon prismatic jaws. Thanks for the tip.
David Huang made his own metal stakes and his website has pictures which show the solution he incorporated into their fabrication in order to mount them into a vice. Go to David Huang .org (leave out the spaces), click on his studio and then click on the photograph album of his raising stakes.
There are some amazing photos on that website. Thanks for the link.
Hi! I love reading detailed articles like this. Thank you. You used different tools from what I learned to use from Betty Helen Longhi, but you got the same results, and that’s so cool! I use wooden stakes like Tim, and I’ve found that they hold in my 4″ vise very well. I haven’t had any problems thus far! Just remember, if the stake is wooden or delrin, use a metal hammer, if the stake is metal, use a delrin mallet. You are not forging metal, you’re forming it.
Hello Diana. The reasoning behind the tools for two purposes – first, I had to made an anticlastic bangle for a customer, and didn’t really have the time to source proper tools (and didn’t want to pay out a lot for a one-off job). Second, I’m trying to capture the simplicity of more primitive jewellers – there’s a certain appeal to rough wooden stakes and pigskin.
Are there other uses for sinusoidal stakes? My dad likes the idea of getting one, but only if it’s useful for more than bangles.
I had a look on your teachers website. Breathtaking work. And here’s me knocking out basic forms. I suppose I need another 20 years, then I might have a chance of producing work like that!
thank you very much for taking the time to share your expertise. i’ve been silversmithing for a fairly short time and have found artists and artisans such as yourself such an inspiration and valuable resource. time for me to practice some anticlastic raising!
Hi, thanks for your comment – it’s good to know that my work is helpful. If you don’t use it already, have a look at a website called Ganoksin.com; there’s a wealth of articles on all sorts of jewellery techniques, and there’s also an excellent mailing list you can join, with lots of jewellers of all ages and abilities asking and answering questions.
Comments on this entry are closed.
{ 2 trackbacks }