
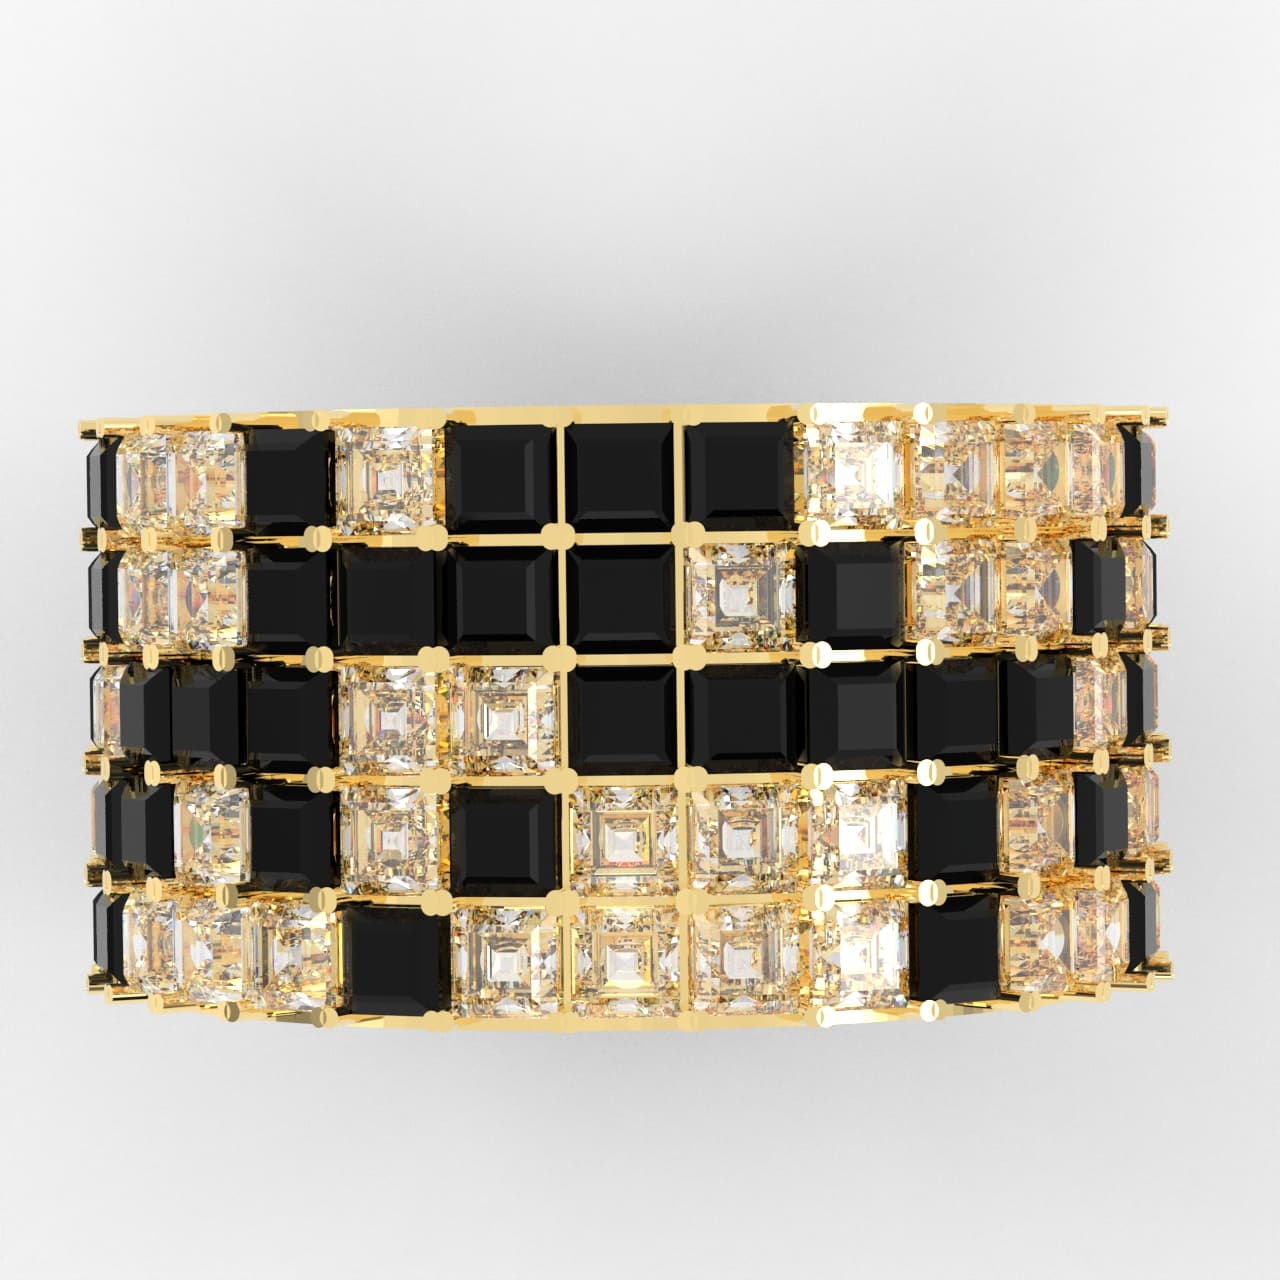
Curb and Cable Chains Project
There are hundreds of different types of chains, each with its own system of assembly. Most chains are assembled from individual links. In some chains, such as the foxtail, the links are individually soldered closed and then assembled. In other chains, such as the mesh and rope chains, the links are assembled and then they all are soldered at one time. Chains like the curb and cable patterns shown here repeat alternating steps of soldering and assembly. The following procedures describe two distinct chain patterns that can be created by treating the same assembly in different ways.
15 Minute Read

There are hundreds of different types of chains, each with its own system of assembly. Most chains are assembled from individual links. (The crochet chain shown earlier is an exception.) In some chains, such as the foxtail, the links are individually soldered closed and then assembled. In other chains, such as the mesh and rope chains, the links are assembled and then they all are soldered at one time. Chains like the curb and cable patterns shown here repeat alternating steps of soldering and assembly.
The following procedures describe two distinct chain patterns that can be created by treating the same assembly in different ways. After making the basic chain (Steps I through 9), cut the sample in half. Make a curb chain by twisting and filing one section of chain (Steps 10 through 14). With the other half, make a cable chain by drawing it through a square draw plate and sanding (Steps 15 and 16).
Chain making gives novice goldsmiths a chance to perfect their bending, forming, soldering, and filing skills through repetition. This project describes the use of a jeweler's saw, file, pliers, torch, hand vise, bench vise, draw tongs, and a square draw plate, also offering insights for those shopping for these essential tools. The procedures employ such skills as sawing, filing, soldering, and bending, and they include an unusual method for making oval links.
1
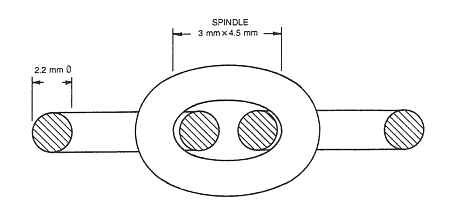
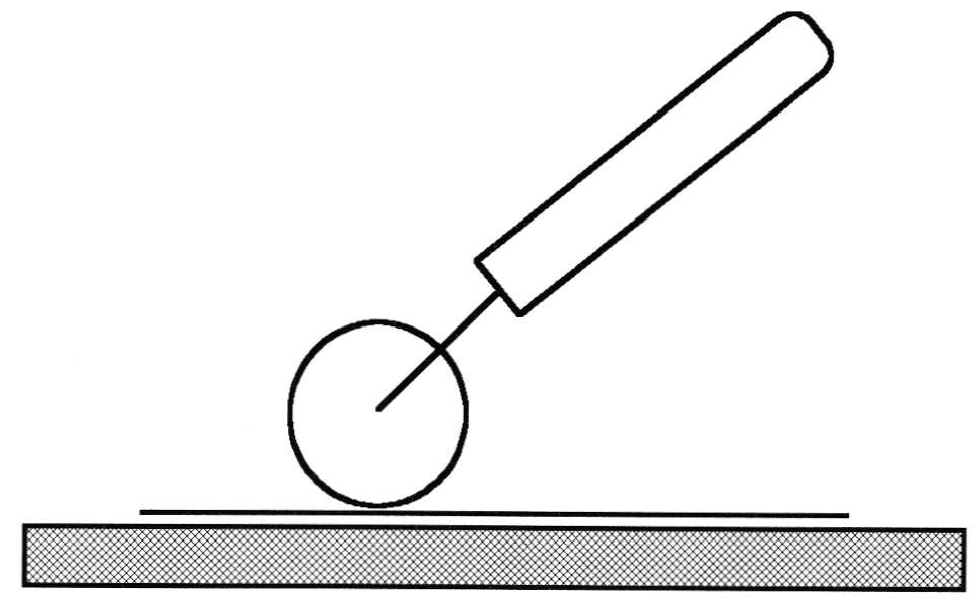
To make the oval-shaped links required by both chains, wrap 2.2-mm round wire around an oval spindle. The ideal spindle is made from an oval piece of steel rod, 3 mm by 4.5 mm, dimensions that permit three links to interlock (Figure P4-1).
| P4-1. Cross section of three links |
2
If an oval spindle is not available, an acceptable substitute can be made from round wire rolled flat in a rolling mill (Figure P4-2).
| P4-2. Rolling wire flat for the spindle |
Rolling Wire Flat
For this spindle, begin with a 10-cm section of 4.1-mm round brass wire.
- Anneal the wire if it is not already soft.
- Insert the wire in the flat portion of the rolling mill.
- Close the rollers until contact is made.
- Roll the wire through the mill.
- Close the rollers farther.
- Continue to roll the wire as the rollers are closed farther and farther.
- Stop when the desired thickness is reached, in this case 3 mm. (See Appendix: Table A-5: Rolling Wire Flat.)
- The width of the wire will increase to about 4.5 mm.
- the wire is to be used as a spindle, do not anneal it but leave it work hardened.
If it is important for the flattened wire to be straight, such as for a component in a piece of jewelry, pull it firmly from the front as it comes out of the mill during flat rolling. Do this by grabbing it with a pair of pliers to maintain pressure, keeping the wire straight.
To keep long thin strips from twisting, pull the metal taut from both the front and the back during flat rolling. This process usually requires two people.
Although the shape of a spindle made this way will not truly be oval, wire links formed around it will be sufficiently oval in appearance. After wrapping wire around a nonround spindle, the assembly will be annealed, so that the wire coil can be removed. This will also anneal the spindle and make it unusable a second time.
3
Put one end of the annealed 2.2-mm wire into a bench vise. Bend the other into an L and clamp it, against the spindle, into a large hand vise. Pull back on the wire and rotate the spindle while wrapping the wire in a tight even coil (Figure P4-3).
4
It is tricky to remove a nonround coil from a spindle. The first step is to anneal the spindle and coil together. Quench in water and dry thoroughly by warming the assembly with a torch until the water evaporates. Oil the assembly well, making sure that the oil penetrates to the contact points between the coil and spindle. Mount a large draw plate into the bench vise backward, with the numbered front of the plate facing away. Select the smallest hole that will permit the spindle to pass through without binding. Insert the spindle through that hole and grab it with a pair of draw tongs. Now pull hard. The spindle will be pulled through the draw plate, but the coil will remain on the other side (Figure P4-4). If a draw bench is available, the job will be even easier.
| P4-3. Winding an oval coil |
| P4-4. Pulling the coil off the spindle |
5
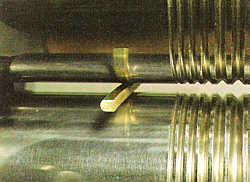
The coil is usually slightly twisted at this point. Use a permanent marker to indicate the top point on each end of the coil. Connect the marks with a straight line, following the twist of the coil. Support the coil against the bench pin. Use a jeweler's saw with 3/0 or finer blades to follow the line, and slit the coil along the tops of thee ovals. Saw at an angle so that the straight line can be sighted and so that more than one link can be sawed at the same time. As the blade passes completely through the links, they will fall off one at a time into the catch drawer or leather apron under the bench pin (Figure P4-5).
| P4-5. Sawing off the links |
Sawing
- When determining the size of blade, make sure that there are at least three teeth metal thickness.
- Install the blade with the teeth facing outward and downward, so that it cuts on the down stroke and glides on the returning up stroke. Clamp the top of the blade into the top clamp on the saw frame. With the top of the frame resting against the bench pin and the base of the handle against your chest, press the frame closed slightly and secure the bottom of the blade, then release the tension on the saw frame.
- Test the tension by plucking; the blade should emit a high-pitched musical note. Always use a tight saw blade, because a loose blade breaks easily.
- Saw with a rhythmic and continuous up and down motion.
- Use the whole length of the saw blade for longer life and better performance.
- Lubricate blades frequently to extend their life. Some goldsmiths use a paraffin-type hard wax; some use a soft wax such as beeswax. Waxes specially formulated for sawing are available from suppliers. In the past, many goldsmiths lubricated their saw blades with soap or even saliva. Lubrication reduces friction and prevents the blade from seizing or binding.
6
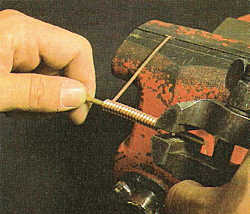
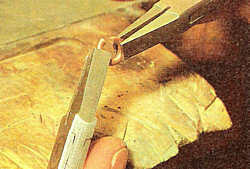
Use two pairs of flat pliers to open the links with a sideways twisting motion. Squeeze the pliers firmly to avoid slipping and thereby damaging the links (Figure P4-6). Do not pull the two ends apart, but twist them sideways. Use a flat needle file to clean up the flat ends of the links, taking off any burrs or irregularities. Do not remove more metal than absolutely necessary, because this will result in egg-shaped, rather than oval, links.
| P4-6. Opening the links sideways |
7
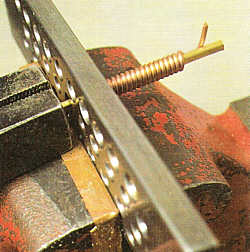
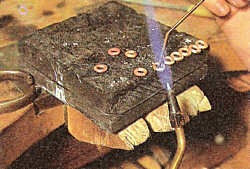
Flux and then close half of the links, using the same twisting technique as in Step 6. Work the ends back and forth until they meet perfectly. Set aside the remaining half of the links that are still open. Line up the closed links, with seams hanging over the edge of a charcoal block. Reflux if necessary, and then place a small snippet of solder on top of each seam. Solder the links closed, by heating from below. Make sure the solder flows completely through the seam (Figure P4-7). Use a solder pick to aid in soldering by holding the links steady during heating.
| P4-7. Soldering half the links closed |
8
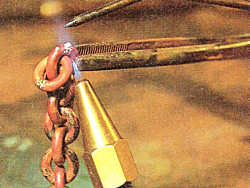
Now assemble the rest of the chain by interlocking the remaining half of the links with the soldered links, one at a time. String an open link through two closed (soldered) links, flux the flat ends, and use two pairs of flat pliers to twist the link closed. Then set up this assembly in a third hand, with the open end of the unsoldered link up and the soldered seams of the closed links down, away from the area to be heated. Flux and add a snippet of solder on top, and then heat carefully from below until the solder flows into the seam (Figure P4-8). If two links accidentally become soldered together, reheat them until the solder flows, freeing the link. As the solder cools, jiggle the loose link with a pair of tweezers to keep it unfrozen. Proceed until the entire chain is complete. Pickle, rinse, dry, and clean with an abrasive pad.
An alternative method is to interlock all of the soldered and unsoldered links before soldering the open links closed. Regardless of the method, after soldering inspect the seams with an optivisor or bench loupe. Links with incompletely soldered seams will crack open under the stress of twisting or drawing, therefore resolder links that do not have perfect seams. Use needle files to remove excess solder.
| P4-8. Assembling and soldering the chain |
9
Buff and polish the chain at this time while you still have easy access to the interior connection between the links. For security, wrap the chain around a thick dowel or a section of a baseball bat, or hold it against a piece of wood as it is brought up to a tripoli-charged buff on the polishing lathe. (Warning: Never hold a loose section of chain against a polishing wheel. This is very dangerous because the chain can easily get caught, ruining the work, and, far worse, perhaps even injuring your hands.) After buffing or polishing one side, stop and reposition the chain, exposing a different side to the polisher. Repeat until all sides of the chain are uniformly finished. To reach recessed areas, use a small bristle-brush wheel in a flex shaft or a larger one on the polisher. (Steps 10 through 14 apply to the twisted curb chain.)
10
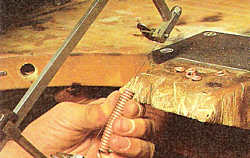
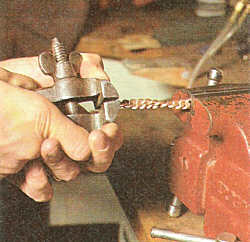
Clamp one end of the chain assembly into the end of a bench vise, the other into a sturdy hand vise. Clamp each of the two end links halfway into the vises, with the seams inserted first (Figure P4-9). These links will be damaged and therefore sacrificed during the process. Wax the assembly to reduce friction. Pull back very hard and align the links without kinks. Continue to pull back hard while slowly twisting the hand vise. To avoid breaking, anneal the assembly after it has been twisted half way. Poorly soldered links will break and have to be resoldered. Depending on the length of the chain, you will need to overtwist a bit, so that when suspended from one end, the chain will hang freely in one flat plane. Remove the chain and saw or clip the two end links that have become deformed during the twisting process.
| P4-9. Twisting the curb chain |
11
Place the chain in a very straight line on a flat steel block or anvil. Pull the ends apart to extend the chain fully. Use a straight edge against the side of the chain to align it. The chain must be mounted on a dop stick, to hold it in position while filing the facets. Use a cool yellow (fuel-only) flame to melt dopping wax or shellac onto the edge of a piece of wood the same width as the chain. (Dopping wax dissolves in acetone, which is toxic. Shellac is a safer alternative because it dissolves in alcohol.) Shape the softened wax into a flat layer on the wood by pressing it against the cool flat surface of the steel block. (Warning: Do not drip hot wax onto your skin; this is very painful. Do not overheat the wax. If it smokes, it is too hot.)
12
With a neutral oxygen/gas flame, warm up the chain very slightly while it sits on the steel block, so that the wax will adhere to it. Now use a cool yellow flame to warm and resoften the dop. Turn the warmed wax stick upside down and carefully place it onto the chain, pressing firmly. After a few seconds, a strong bond will form between the hot sticky wax and the warm chain. When turned right side up, the chain should be set firmly into the wax in perfect alignment, straight and flat. Set the assembly aside to air-cool.
13
After the wax has solidified, mount the stick into a bench vise, with the chain upward in preparation for filing the facets.
Filing Flat
- Always mount large files into file handles. Handles offer far more control and safety than does just holding onto the unmounted tang of a file.
- Hold the file firmly. Imagine a straight line running from the tip of the file to your elbow. Hold the file handle firmly, with your index finger pointing toward the tip of the file. Line up your hand and wrist with this imaginary line. Squeeze your fingers and lock your hand and wrist in alignment with the file. As you file, do not flex or bend your wrist. Only your elbow and shoulder should flex during precision flat filing, not your hand or wrist.
- Apply a little pressure on the forward stroke, and then lift or lightly slide the file for the return. Files do not cut on the returning back stroke.
- Try to file with a sliding diagonal forward stroke. As the file moves forward to cut, allow it to slide sideways as well (Figure P4-10).
- When filing a large flat surface, periodically change direction so that the surface becomes uniformly flat in all directions.
- When filing on an object held against the bench pin, first position the file and then bring the work up to the plane of the file. It is easier to do this than to position the work and try to bring the file to its plane.
- When filing on an item that is mounted in a vise, maintain even pressure by holding the tip of the file with your free hand.
- Constantly monitor and correct for straightness.
| P4-10. Filing the facets of the chain while mounted on a dop stick |
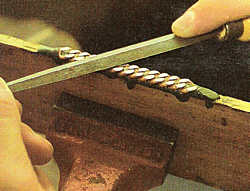
Use a large flat #2 file to file facets in the links of the chain. Links that are slightly out of alignment will initially show different-sized facets. This difference will become unnoticeable later as the depth of the facets is increased. (Note: If the chain is made of precious metal, make a paper catch tray to trap the filings.) File uniformly to the desired depth. Dop or shellac that clogs the file can be removed with a pick or file brush, or it can be dissolved in the appropriate solvent. Finish the facets with sanding sticks: first with 220- and then 400- and 600-grit paper. (Remember to change direction with each progressively finer grit, so that you can see whether the surface has been filed or sanded evenly.)
14
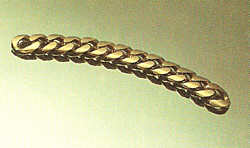
To remove the chain from the dop stick, place the assembly in a freezer for 10 minutes. Remove and crack the chain off of the brittle wax. Immerse the chain in the appropriate solvent to remove any residue. Rinse in water. Place the chain on the flat anvil again, this time with the faceted side up, and repeat Steps 12 and 13 to create facets on the other side of the chain. If desired, the facets on one or even both sides can be filed to an elegant domed contour. Do this after the facets are filed flat. Begin by holding the file at a 45′ angle and remove the corners on each side of the flat facet. Continue with a flat file, using slow, even, curved strokes to create an even row of domed facets replacing the flat ones. Finally, buff and polish the twisted curb chain as described in Step 9 (Figure P4-11). This chain can be fastened by a variety of different catches. A box clasp, as described in Project 18, can be customized to integrate with the chain, or a sister hook, as described in Project 12, can be used. (Steps 15 and 16 apply to the cable chain).
| P4-11. Finished twisted curb chain |
15
After the chain has been assembled, buffed, and polished, draw it through a square draw plate to achieve the cable chain pattern. Insert a 50-mm section of 2-mm round wire through the end link, folding it in half to serve as a handle or "draw dog." Mount a square draw plate into a bench vise. Lubricate the chain and insert the handle from the back, through the largest square hole that makes contact with the chain. Use draw tongs to grab the handle and pull the chain through the hole (Figure P4-12). As you draw the chain through the draw plate, guide the links into an alignment of alternating diagonal planes. Continue to reduce and compress the chain as flat facets are created on the sides of the links. Stop when the first sign of tightness is felt between the links, usually after three or four holes. Be careful not to overdraw the chain because this will stiffen it and cause irreparable damage.
16
| P4-12. Drawing the cable chain through a square draw plate |

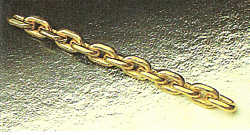
If desired, the facets along the chain can be cleaned up and accentuated. To do this, place the cable chain flat on a piece of 400-grit abrasive paper with one of the four faceted sides down. Rub the chain on the paper to align and finish the facets. Rotate the chain and repeat for the other three facets. Place the chain on finer 600 grit paper and repeat the process. Finish the chain by buffing and polishing as described in Step 9 (Figure P4-13). A variety of clasps can be attached to secure this chain, including a sister hook, as described in Project 12. A cylinder clasp, as described in Project 19, can be fabricated in square tubing and added to complete the chain.
| P4-13. Finished cable chain |
| Excerpts from: Professional Goldsmithing By Alan Revere, 1991 Photography by Barry Blau Illustration by George McLean and Alan Revere Purchase your own copy of "Professional Goldsmithing" today. |


You assume all responsibility and risk for the use of the safety resources available on or through this web page. The International Gem Society LLC does not assume any liability for the materials, information and opinions provided on, or available through, this web page. No advice or information provided by this website shall create any warranty. Reliance on such advice, information or the content of this web page is solely at your own risk, including without limitation any safety guidelines, resources or precautions, or any other information related to safety that may be available on or through this web page. The International Gem Society LLC disclaims any liability for injury, death or damages resulting from the use thereof.
Related Articles

Special Repair Work
Bench Mag Favorite Tips 2002
Pulse-Arc-Welder: Closing Chains
Basic Spiral Braiding

The All-In-One Jewelry Making Solution At Your Fingertips
When you join the Ganoksin community, you get the tools you need to take your work to the next level.
Trusted Jewelry Making Information & Techniques
Sign up to receive the latest articles, techniques, and inspirations with our free newsletter.