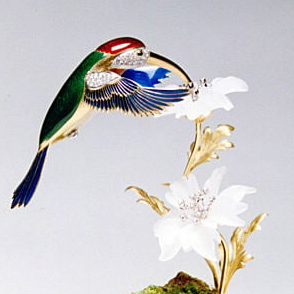
Enameling on Sterling Silver
I enamel on various metals making a variety of pieces from post earrings to 5" x 8" framed enamels. The enameling techniques I use for sterling silver are cloisonnE, champlevE and plique-a-jour. When I began enameling in 1971, it was accepted that true transparent enamels could not be used on sterling silver. After studying with Joanna Stone, I persevered with my experimentation until I developed a procedure for enameling on sterling silver. Every step is important. My sterling enamel jewelry pieces are made with a narrow sterling frame that I cut out with a jeweler's saw blade. The same pattern is used to cut out both the bottom piece and the frame. The frame is sweat soldered to the face of the sterling piece that is to be enameled. This method eliminates the need for making a bezel setting for the enamel. I also use this method for combining champlev with the cloisonn. Instead of making just a frame, I saw out two full size pieces and then saw out cells in which I will enamel and place cloisonn wires in either some or all of the cells.
8 Minute Read

I enamel on various metals making a variety of pieces from post earrings to 5″ x 8″ framed enamels. The enameling techniques I use for sterling silver are cloisonné, champlevé and plique-à-jour. When I began enameling in 1971, it was accepted that true transparent enamels could not be used on sterling silver. After studying with Joanna Stone, I persevered with my experimentation until I developed a procedure for enameling on sterling silver. Every step is important.
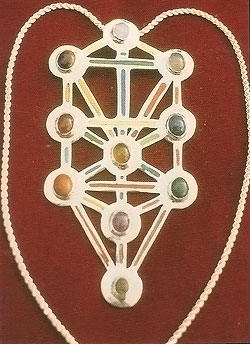
| Tree of Life: Meditation necklace. 3″ x 6″ champlevé sterling, fine silver, opaque enamel. |

My sterling enamel jewelry pieces are made with a narrow sterling frame that I cut out with a jeweler's saw blade. The same pattern is used to cut out both the bottom piece and the frame. The frame is sweat soldered to the face of the sterling piece that is to be enameled. This method eliminates the need for making a bezel setting for the enamel. I also use this method for combining champlevé with the cloisonné. Instead of making just a frame, I saw out two full size pieces and then saw out cells in which I will enamel and place cloisonné wires in either some or all of the cells.
The sterling silver needs to be accurately alloyed of no less than 92/100 silver content. Reputable refiners can do this. I specify that the sterling is to be enameled and, if possible, the sheets are to be annealed. When I use 24 ga for the enameled piece, I select 18 ga for the frame. With an enamel piece of 18 ga, I use 20 ga to 22 ga for the frame. The 18 ga base needs only one counter enamel coat. Since the thinner gauge will warp easily, it needs about three coats of counter.
I often do an exact drawing using colored pencils. From the drawing, I make templates of 20 ga to 22 ga copper as patterns for the enamel piece and the frame. I use the jeweler's saw to cut these templates; then I scribe their shapes on the sterling sheet and saw them out. If the sterling is not annealed, I coat both sides of the two pieces with soldering flux (borax and water, or Battern's) and anneal them either with a torch or in the kiln. The flux and oxide are removed in a fresh hot pickle of 1:1 nitric solution.
Caution!
Remember to add acid to water. Never add water to acid. When using acid, it is advisable to wear proper gloves, long sleeves, face mask and safety goggles. Sparex may be substituted for the nitric solution. If the sterling sheet came annealed, then it only needs to soak briefly in the fresh acid solution to remove all oils. To neutralize the piclde, I add water to the solution followed by the very slow addition of small quantities of baking soda. I wash the pieces thoroughly with fresh water.
Next, I borax-flux the piece and the frame and then secure them together with binding wire to be sweat soldered with IT silver solder or tested hard silver solder if I am unable to get the IT solder. There should be no solder on the area of the metal to be enameled. I bright dip the soldered unit to remove oxides. A freshly made 1:1 nitric acid solution at room temperature is needed for the bright dip. Sparex 2 also works well. Bright dipping is the most important step in the preparation of sterling for transparent enamels. The bright dip eats away a layer of sterling silver oxide, along with a layer of sterling silver.
The trick is to know when to remove the piece from the acid before irreparable damage is done by extreme acid pitting. This depletion gilding is learned with experience. The soldered piece is placed gently in the acid bath. I use a Pyrex dish with a cover for the acid. Bubbles that rise to the surface of the metal are removed periodically by brushing across the piece with a long feather. When the piece is very dark, uniform gray in most places (it will be darkest around the solder seam), it is removed from the bright dip bath with wooden or plastic tongs, rinsed, neutralized with baking soda, rinsed and cleaned with a glass brush.
I put on rubber gloves to protect my skin from the minute glass threads that break off and can stick tenaciously and painfully. I rub the metal lightly with a glass brush in a circular motion under running water to minimize breakage of the glass brush. The glass brush removes the black residue of oxide that the acid brought to the surface.
At this point, the piece may be domed evenly and slightly with a rawhide mallet by striking the face of the piece that is held over a steel stake. The findings are soldered on the back with as little IT solder as possible, the firescale removed again and the piece glass-brushed as before. The piece is now ready to be enameled.
I use 80 mesh, transparent, unleaded enamels. I also purchase these enamels in lump form that I grind with a mortar and pestle when I am ready to use them. I prefer grinding my own. I wash the enamels, about a tablespoon of each ground color, with distilled water until the water is clear. To make the enamels absolutely clean, a few drops of nitric acid are added to a pint of water and the enamels are then re-washed in this solution. A final washing with clean water is required to rinse away the acid water. I have found that unused wet enamel powder tends to break down and become discolored if stored.
The first coat of enamel is hard fusing to prevent that coat from bubbling through subsequent coats of medium and soft fusing enamel. I wet pack damp enamels with thin to medium size horsehair brushes. I also use a curved dental tool, the double-ended stainless steel kind that has one end shaped like a little scoop. The frame, of course, is not enameled. I wet pack the back first, add a few drops of uncut Klyr-Fyre on the enamel and then draw off any of the excess water with a piece of tissue.
When the enamel has partially dried or become tacky, the piece is turned over to enamel the front side. There I wet pack Thompson's silver flux #757, especially if I plan to use transparent reds or pinks; otherwise, I sometimes wet pack the transparents as the base coat. Though leaded enamels yield better colors in the reds, I feel safer staying with the unleaded enamels. The piece is placed on a trivet to dry and then fired just to maturity in my 110V electric kiln at about 1350°F. I use a pyrometer, but my sixth sense tells me when to peep in the kiln.
Next comes placing of the cloisonné wires with uncut Klyr-Fyre. For gold wire, I hammer 22K, 16 ga or 18 ga round wire into the rectangular thinness I want. The wet packing, drying and firing is repeated three to five times until the fired enamel is slightly higher than the frame rim.
Finishing is done by stoning under water, first with a coarse Carborundum stick and then a medium-grain one. The grinding continues until all enamel is removed from the frame and the wires, leaving the enamel even. The dull enamel surface is thoroughly washed and glass-brushed to remove any grains of Carborundum. For a final finish there is a choice. The surface of the enamel may be rubbed with fine paste-wax polish on the fingertips for a matte finish, or the piece may be flash-fired in the kiln for a glossy surface.
If the piece is flash fired, the exposed sterling silver frame will need to have the oxidation removed. This removal is a delicate matter because the enamel should not be scratched. I use tripoli or white diamond compound on a hard felt buff on a regular polishing motor. I strongly suggest that if you have not used a polishing motor that you either take a jewelry class or have someone knowledgeable show you how to use the equipment. You can be hurt badly if you are inexperienced or careless.
Care must be taken not to overheat the piece with the polishing wheel or else the enamel will crack. If you remove the piece from the wheel when your fingers become hot, you will be safe. When the oxide has been buffed off, a soft flannel buff charged with rouge is used for a final polish of the sterling silver frame. If the piece is a pin, the pin stem is attached to the findings that were soldered on before enameling. For small surfaces and getting into crevices with buffing wheels, I use the Dremel electric tool following the same progression of buffing wheels with white diamond, tripoli and red rouge.
For plique-à-jour earrings, I bend and hard solder sterling silver 14 ga round wire in the shape of a fish or a bird and then flatten the forms with hammers. Sometimes I solder on a jump ring before the depletion gilding. Sometimes I drill a hole for the earwire.
The sterling is prepared for enameling as previously described. After hot pickling and rinsing the frame, it is placed on a sheet of mica and then on the firing planche. The enamel will not adhere to the mica. The enamel is wet packed with transparent enamels, dried and fired. This process is repeated until the fired enamel is at the edge of the rim of the frame. The piece is stoned gently under running water until no enamel is on the frame. The piece is flash fired, and the sterling silver frame is polished after the mica sheet is removed.
I have always had a small fire extinguisher in my studio, but, fortunately, I have never had to use it. One needs to respect and approach with caution acids, electrical equipment and other tools to be able to work safely.
P. Alexa Foley began enameling in 1971. She studied with Joanna Stone, and then persevered with experimenting until she developed her method for enameling on sterling. She spent many years as a successful enamelist, creating cloisonné, champlevé and plique-à-jour enamels. As a realtor with a GRI, she now resides in Maui, HI where she does some enameling and painting. In June 2001, Alexa received her M.A. in Cultural Anthropology and Transformative Learning.
You assume all responsibility and risk for the use of the safety resources available on or through this web page. The International Gem Society LLC does not assume any liability for the materials, information and opinions provided on, or available through, this web page. No advice or information provided by this website shall create any warranty. Reliance on such advice, information or the content of this web page is solely at your own risk, including without limitation any safety guidelines, resources or precautions, or any other information related to safety that may be available on or through this web page. The International Gem Society LLC disclaims any liability for injury, death or damages resulting from the use thereof.
Related Articles

The Art of Gold

Expressive Art Enameling

Precious Metal Refining
Gold Refining – Part 1

The All-In-One Jewelry Making Solution At Your Fingertips
When you join the Ganoksin community, you get the tools you need to take your work to the next level.
Trusted Jewelry Making Information & Techniques
Sign up to receive the latest articles, techniques, and inspirations with our free newsletter.