Goldsmithing: Etching on Metal
Etching uses chemical corrosion rather than mechanical force to selectively remove metal. Simply put, the idea is to cloak parts of an object with an acid-proof paint then submerge the piece in acid. The caustic liquid eats away at exposed areas to create a relief. When the proper depth is reached the piece is withdrawn, rinsed and cleaned to reveal a pattern of raised and lowered sections. The process can be used for delicate linear drawings, for bold reliefs, for letters, and as a preliminary step for enameling, niello, or inlay.
8 Minute Read

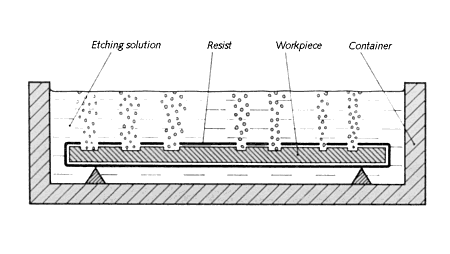
Etching on metal uses chemical corrosion rather than mechanical force to selectively remove metal. Simply put, the idea is to cloak parts of an object with an acid-proof paint then submerge the piece in acid. The caustic liquid eats away at exposed areas to create a relief, figure 10.64. When the proper depth is reached the piece is withdrawn, rinsed and cleaned to reveal a pattern of raised and lowered sections.
The process can be used for delicate linear drawings (fine art prints), for bold reliefs (armor), for letters (plaques on buildings), and as a preliminary step for enameling, niello, or inlay.
| Figure 10.64 Prepared piece in the etching solution. |

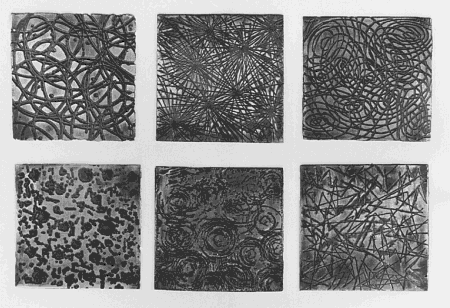
The technique of etching has a long history, and can be glimpsed in the richly decorated beaker in figure 10.65. After a period in which etching was used primarily to mimic other techniques, principally engraving, in more recent times etching has been used as a vibrant graphic technique with its own specific look, as can be seen in the examples in figures 10.66 to 10.68.
The process itself if quite simple, though there are details of acid concentration and exposure time that will require some experimentation. Far more urgent is the need for safety cautions. The following section discusses strong dangerous chemicals that must be used with care. Any handling of acids requires the use of protective clothing, goggles, and adequate ventilation. Metalsmiths unwilling or unable to meet those demands should not pursue etching.
| Figure 10.65 Silver Goblet, Etched ornamentation. About 1500. (Craft Museum, Leipzing) |

Preparing the Articles
Though each case is unique, etching is usually done in the late stages of construction, typically after all soldering has been completed. The metal is finished at least to a light sandpaper stage; because the etched surface will be matte, there is the potential for dramatic contrast if the pre-etched surface is polished to a high shine. Whatever the finish, the piece is pickled and washed to insure a grease-free surface. It is then handled only by the edges, or outfitted with a wire handle to make it easier to hold in the next steps.
All areas that are not to be attacked by acid must be completely covered with resist, by which we mean any substance that will protect it. This includes the back, all edges, and interior areas in some cases. Remember: the acid is not discriminating and will go everywhere it can!
Black asphaltum, a mixture of asphalt and turpentine, is the most common resist. It can be purchased from art supply and hobby shops. Other resists might include varnish, paint and wax, but these are not as easy to apply or remove, and cannot be guaranteed to stand up to all acids.
Applying the Resist
Use a brush to paint the resist onto the metal in a layer that is thick enough to insure complete coverage but not so thick it will chip when a design is scratched through it. The metal piece might be slightly warmed to assist in this, but too much heat will cause the asphaltum to drip off and slow down its rate of drying, which is already quit slow. It is also possible to mix asphaltum with beeswax to create a solid form called hard ground. This is formed into a lump that is rubbed over warm metal to build up the resist layer.
In some designs the etched portion is a relatively small part of the surface. In those cases the object is entirely covered with resist which is then scraped away to reveal bared metal in the places where an incised line is desired. Use a needle or similar small tool to scrape away the resist, taking care to lift off the curls of asphaltum so they don't accidentally fall back onto the piece where they might be cover up a scratched line.
In cases where large areas are to be exposed it is still possible to scrape away resist (use a knife or scraper) but often more efficient to paint the asphaltum selectively in the first place. It is still possible, after the resist has dried, to come back into the design with a needle to refine lines or add details.
Photographic Resists
It is possible to use photographic rather than drawn images, a somewhat technical process that we will not pursue here. It is worth noting, however, that the technique is a straightforward extension of traditional etching, the only difference being the way in which resist is applied to selected areas of a sheet. Interested artists are encouraged to seek additional information through books or by visiting a local shop that does such work.
Mordants
The proper mordant, or etching fluid, must be used for each metal, see Table 10.2. In addition it is important that the acid be mixed to its proper concentration, which generally means that it is diluted with water. Ferric (III) chloride FeCl3 is an exception to this in that a diluted solution etches more intensely than a concentrated one.
It is usually best to foster a slow etch. If the process goes too quickly the artist misses the chance to check depth frequently and make sensitive decisions. Also, a rapid bite tends to undercut or eat outward. In places where there is a thin line of asphaltum, the acid can cut it off from below, ruining the design. And finally, a concentrated acid solution might attack and lift a resist that is otherwise sufficient for the mordant being used. Follow the information in Table 10.2 carefully to avoid these problems.
The Etching Process
SAFETY NOTE: The acid is used in a container approved for this purpose, generally of thick glass or a special plastic. Because of the danger of accidents, use only approved vessels, which can be purchased through a chemical or scientific supply house. You might find it helpful to consult with the chemistry department of a local high school or college to locate a supplier. Work is done at room temperature in a well ventilated environment. It should go without saying that strong chemicals like acids should never be used in unguarded areas where children, pets or others might wander. Even then it is important to clearly mark the mordant as a dangerous substance!
The prepared piece is set into sufficient acid for it to be completely covered. The exposed areas will immediately appear matte, the effect of a layer of microscopic bubbles that forms on the surface. Most etchings will require several hours to achieve a reasonable depth, but the work must be checked periodically to be certain it doesn't go too fast.
It is possible to lift the work from the acid, rinse it and check it, but even a careful viewing in strong light is insufficient to really determine how deeply the acid has etched. To really tell you need to scrape away a bit of the resist so you can see the line itself, but this is of course a problem if the piece needs to go back into the acid - the scraped section will now be etched. To solve this, prepare a test plate of the same metal, scratch several lines into it and set it beside the piece in the acid. This can be checked periodically, always returning it to the bath so it reflects the same exposure as the work.
As etching continues, the metal forms a layer of bubbles that will limit the ability of fresh acid to reach the surface of the metal. Brush the bubbles away every few minutes with a goose feather, the best tool for the job.
| Figure 10.67 Student practice with etched textures. Copper Technical School of Applied Art, Helligendamm |
Etching Copper in Hydrochloric Acid
A special case should be mentioned here, the use of hydrochloric acid on copper. Though the acid will work on copper by itself, the action is speeded up through the addition of hydrogen peroxide, through which oxygen is introduced to the chlorine atoms. This addition will stimulate the acid to etch more rapidly and to create straight-walled cavities. Unfortunately this advantage is unique to copper and hydrochloric acid. No similar situation exists for other metals or mordants.
The solution dissipates constantly - the oxygen goes off as vapors - so it must be remixed as needed. The process is made more dramatic if the solution is intermittently applied to the metal, that is, if the piece is dipped and lifted repeatedly. In the case of round objects like bracelets and rings it is possible to contrive a sort of rotisserie that holds the work above the acid so that just a small portion dips into the bath. In this situation a standard etch can be achieved in 2-4 hours (according to information from Dr. Walter Lachmann, Hamburg).
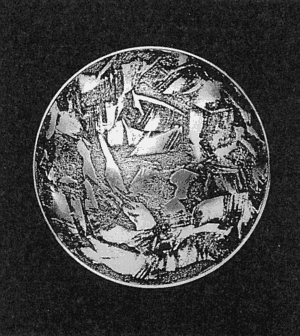
| Figure 10.68 Aluminium Brooch Etched texture, Student work Technical School of Applied Art, Helligendamm |
Finishing Treatments
When the desired depth is reached, the work is removed from the acid and thoroughly rinsed under running water. It is important to guarantee that all trace of acid has been removed, a process that can be difficult in hollow or intricate pieces. After rinsing, the work is submerged in a solution of baking soda and water where it is agitated to insure that every surface is exposed to the neutralizing solution.
Before removing the resist it should be noted that a selective electroplating can be done at this stage. The gold or silver plating will only adhere to the recently etched, exposed areas.
The resist is then removed with turpentine or lacquer thinner, again observing the important rules of ventilation and fire safety. Remember to dispose of solvent-filled rags properly, and to store the acid in approved and well marked containers.
The object can be handled like any other in terms of soldering, patination and buffing, but care should be taken to minimize the use of mechanical buffing because it risks erasing the etch!
You assume all responsibility and risk for the use of the safety resources available on or through this web page. The International Gem Society LLC does not assume any liability for the materials, information and opinions provided on, or available through, this web page. No advice or information provided by this website shall create any warranty. Reliance on such advice, information or the content of this web page is solely at your own risk, including without limitation any safety guidelines, resources or precautions, or any other information related to safety that may be available on or through this web page. The International Gem Society LLC disclaims any liability for injury, death or damages resulting from the use thereof.
Related Articles
Damascus and Pattern Welding

Photographic Images on Refractory Metals
Martha Glowacki & Fields of Reference
The Seven Korean Metalsmiths

The All-In-One Jewelry Making Solution At Your Fingertips
When you join the Ganoksin community, you get the tools you need to take your work to the next level.
Trusted Jewelry Making Information & Techniques
Sign up to receive the latest articles, techniques, and inspirations with our free newsletter.