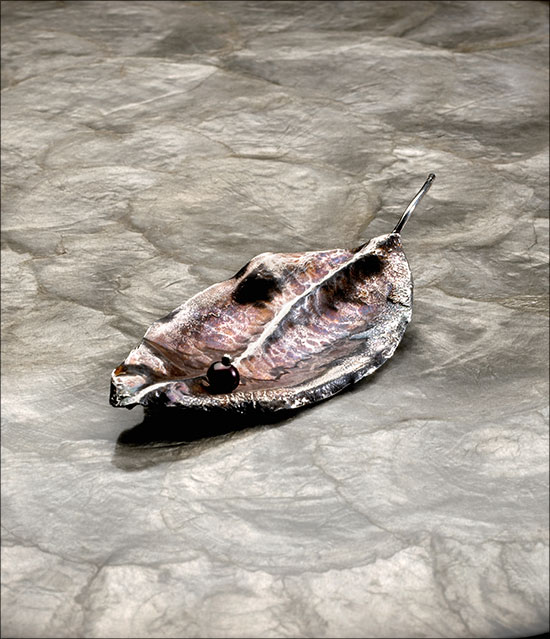
Forged Leaf Brooch Tutorial
Use basic metalsmithing skills to create a brooch inspired by forms found in nature. Since the earliest civilizations, the leaf shape has been an inspiration for jewelry. With this 4 1/2 x 13/4-in. (11.4 x 4.4cm) brooch, you can evoke the beauty of fall foliage or the first leaves of spring. Experiment with patinas to enhance the hammered texture of your leaf.
7 Minute Read
Since the earliest civilizations, the leaf shape has been an inspiration for jewelry. With this 41/2 x 13/4-in. (11.4 x 4.4cm) brooch, you can evoke the beauty of fall foliage or the first leaves of spring. Experiment with patinas to enhance the hammered texture of your leaf.
Materials | |
Tools and Supplies | |
|
|
Make the Leaf Shape | |
Photocopy a leaf. Cut out the photocopy, leaving a 1/8-in. (3mm) border around the leaf. Use a glue stick to adhere the leaf cutout to 22-gauge (0.6mm) sterling silver sheet [1]. Allow the glue to dry. Use a jeweler's saw with 2/0 blades to saw out the leaf [2]. Soak the metal leaf in water to remove the paper and glue. File the edges of the leaf with a #2-cut, half-round hand file to remove burs. Sand the leaf with 220-grit sandpaper, progressing through finer grits, to smooth the edges. | |
Solder on the Stem | |
Place the leaf on a soldering pad. Cut a 4-in. (10.2cm) piece of 14-gauge (1.6mm) sterling silver wire, and lay it along the center of the leaf. Flux the leaf and the wire. Leave at least 1 in. (25.5mm) of the wire protruding from the base of the leaf for the stem. Place pallions of medium solder so that they touch both the leaf and the wire [3]. Use a large, soft, bushy flame to heat the entire leaf during soldering [4], but be careful not to melt the edges or the stem. Quench, pickle, and rinse the leaf after soldering. | |
Shape the Leaf by Forging | |
| Dry the piece thoroughly, then place it on an anvil, wire-side down. Use the ball face of a ball-peen hammer to forge on both sides of the center vein [5]. Hammering the silver work-hardens it, which can cause the silver to crack. To return the silver to a workable state, you will need to anneal it. | |
Anneal to Relieve Work-Hardening | |
| Whenever the sterling silver gets too stiff to move easily, anneal it. To anneal the metal, flux it, and heat it until the metal has a dull rose-colored glow [6] (dim the lights to see the glow better). When the flux turns clear, quench the silver in water. Be careful not to heat the metal for too long or at too high of a temperature, because that also can cause the metal to crack. Once the silver is annealed properly, continue to hammer the leaf to achieve the shape you desire. | |
Curve the Edges of the Leaf | |
| Use dividers to mark a line on the back of your leaf 1/8 in. (3mm) from the edge [7]. Use the scribed line as a guide in placing the edge of the leaf so it hangs over the corner of your anvil. Carefully aim your strike at the edge of the anvil to shape the leaf's edge downward [8]. Do as much shaping as you like. If the leaf has curled too much, place it on a wood block and flatten it with a rawhide mallet. | |
Drill a Hole for Setting a Pearl | |
| Mark on the leaf where you want to rivet a pearl. Use a center punch to make a dimple at the mark. To make a tight-fitting hole for your rivet, use a drill bit that matches the wire's gauge. Use a brass slide gauge to measure your wire and select a drill bit to match. To make sure your pearl will fit on your rivet wire, see "Drill the Pearl" sidebar. Drill a hole in the leaf [9], using the dimple to guide your drill bit. For another way to set a pearl on your leaf, see "Riveting Alternative". | |
Solder on the Pin-Back Finding | |
A pin-back finding consists of a hinge, pin stem, and a catch. Pin-back findings should be placed slightly above the center of a brooch to keep it from tipping forward. To decide the placement of your pin back, consider the weight of the leaf and how you want it to lie when it's worn. The catch should be placed with its opening facing downward to keep the brooch from falling off if the catch comes open during wear. The hinge must align with the catch so that the pin stem can work properly. Lay the pin stem in place to see if the alignment is correct. Sweat easy solder on the back of the leaf where the catch and the hinge will be attached [10]. Quench, pickle, and rinse the leaf to clean it. | |
| Paint water-based correction fluid (anti-flux) onto the catch to prevent the solder from flowing into the catch mechanism. Allow it to dry completely. Set the pin stem aside. Flux the hinge, the catch, and the leaf. Heat the leaf until the flux is a dry crust. Pick up the hinge with your tweezers and place it on the appropriate sweat-soldered spot on the back of the leaf [11]. | |
Repeat to Place the Catch | |
Heat the piece again until the solder flows. Remove the heat immediately after the solder flows so the catch does not wick solder up into its mechanism. Quench, pickle, and rinse the piece, and then check the catch to make sure it works. If desired, apply a liver of sulfur patina to the leaf by following the manufacturer's instructions. | |
Rivet the Pearl | |
| Ball up one end of a 1-in. (25.5mm) piece of 18-gauge (1.0mm) silver wire. Thread the other end of the wire through the pearl and the hole in the leaf. Trim the wire with a flush cutter so it extends about 1/64 in. (0.5mm) beyond the back of the leaf. Place the ball into the smallest hemisphere on a dapping block [12], or place the ball against an anvil. Gently tap the cut wire end with a riveting (cross-peen) hammer [13]. The wire end will spread, securing the pearl. If the balled end flattens slightly during riveting, use a cup bur in a flex shaft to round it [14]. Be careful not to scar the pearl with the sharp edges of the cup bur. | |
Install the Pin Stem | |
| Place the pin stem in the hinge [15] and squeeze the hinge with chainnose pliers to capture the pin stem [16]. The point of the pin stem should not extend beyond the catch. Use wire cutters to trim the pin stem [17]. File the end of the pin stem to a point. Sand the pin stem with progressively finer sandpapers. Polish the tapered pin stem with a buffing stick and tripoli polishing compound until it is smooth. | |
Drill the Pearl
Riveting with wire smaller than 18 gauge (1.0mm) is very difficult, yet most full-drilled pearls have holes that are much smaller than 1.0mm. You will need to enlarge the hole in your pearl to fit the thicker-gauge wire needed for the rivet.
Drill the pearl using the same drill bit that you used to drill the hole in the leaf. Hold the pearl in a shallow dish of water and slowly drill through the existing hole. Retract the bit from the pearl every few seconds to allow debris to clear from the bit, and then continue drilling. The water acts as a lubricant, keeping the bit cool so friction doesn't burn the pearl.
Riveting Alternative
To eliminate the need to drill and rivet the pearl, use a half-drilled pearl. Half-drilled pearls are drilled with slightly larger holes that do not pass completely through the pearl.
Solder a 1/4-in. (6.5mm) piece of wire into the hole in the leaf using medium solder. Sand the wire flush on the back of the leaf. Trim the wire, or peg, protruding from the front of the leaf so that the pearl will fit completely over the peg. Attach the half-drilled pear to the peg by putting a small drop of epoxy on the peg and inserting the peg into the pearl.
You assume all responsibility and risk for the use of the safety resources available on or through this web page. The International Gem Society LLC does not assume any liability for the materials, information and opinions provided on, or available through, this web page. No advice or information provided by this website shall create any warranty. Reliance on such advice, information or the content of this web page is solely at your own risk, including without limitation any safety guidelines, resources or precautions, or any other information related to safety that may be available on or through this web page. The International Gem Society LLC disclaims any liability for injury, death or damages resulting from the use thereof.
The All-In-One Jewelry Making Solution At Your Fingertips
When you join the Ganoksin community, you get the tools you need to take your work to the next level.
Trusted Jewelry Making Information & Techniques
Sign up to receive the latest articles, techniques, and inspirations with our free newsletter.


