Laser Welding Full Prong Replacement
3 Minute Read
One of the most frequent repair jobs involving the laser is prong repair. This is the first in a series of articles on laser welding prongs. Much has been said about the ability of the laser to do the "impossible" repairs. Though there is some substance to that claim, it has also been exaggerated to some degree.
Lasers can do many repair and fabrication jobs that an experienced bench jeweler would not attempt with a torch and solder. An experienced laser technician can perform repairs that, frankly, will amaze those who have an understanding of what can and cannot be done with a torch. The fact of the matter is, however, some repairs are difficult, if not sometimes impossible, even for an experienced laser technician.
In addition, lasers can damage sensitive stones and finishes. Great care must be taken when welding any item. With these things in mind, let us look at this issues laser repair project.
Full Prong Replacement on Opal and Emerald Pendant
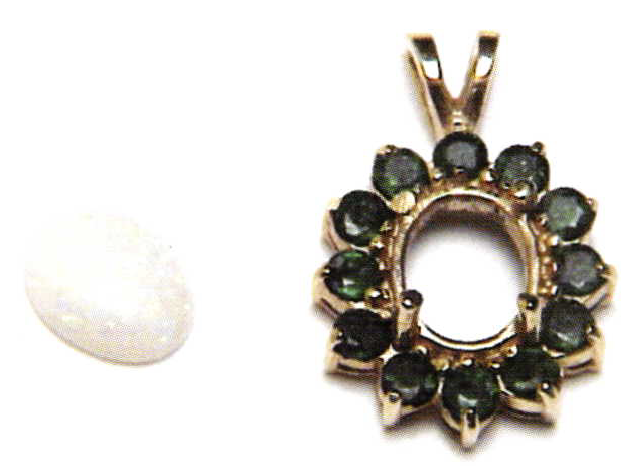
A client has a 14 karat yellow gold, opal and emerald pendant. One of the center prongs broke off at the base of the opal seat. Our responsibility is to replace the prong and set the opal. (Fig. l)
I have measured the remaining three prongs and have determined that each prong is approximately l.30mm wide or l6 gauge. We will use a piece of stock round wire for the replacement prong. (Fig.2)
Notice the angle at which the prong is cut. This will insure a good, deep weld into the replacement prong. Weak joints and especially prongs that break when bent during the setting process have frustrated some lasertechnicians, including myself. This technique for attaching prongs has given me a much greater success rate for prong repair. As with any repair job, whether you use a laser or a torch to perform it, sometimes things just don't go, as you want them to go. In my experience, tapering the base of the new prong like the example shown has all but eliminated troublesome prong replacements. For those who use a torch to do prong replacements, this is contrary to good torch/ solder skills. Having a joint as flush and tight as possible is a must for good torch/solder repair. Laser welding, on the other hand, does not require such tight tolerances, because you can fill a gap with gold wire while laser welding.
The tapered side of the prong will face the inside of the mounting. Though lasers can be used successfully in close proximity to sensitive stones and finishes, discretion would dictate that we pulse the laser as few times as possible on the outside of the prong next to the emeralds. We will do the majority of welding as far away from the emeralds as possible.
Make an initial tack weld to hold the prong in place and check the alignment for the replacement prong.
Once you are comfortable that the alignment is proper, you are ready to fill in the gap at the base of the prong to the inside ofthe pendant. I used 30gauge 14 karat yellow gold wire to fill the void. Fill out to flush.
Now we will attempt to weld the outside of the prong next to the emeralds. The next picture shows the use of a template fashioned out of sterling silver. This template (though not polished for this picture) should have a high polish. Since silver is highly reflective, it makes a great protective substance for laser welding.
A Word Of Caution
The laser will oxidize the surface of the silver where you are pulsing so keep it wiped off and or polished. When silver is oxidized, it absorbs the full strength of the pulse and you can weld silver to the 14k prong or damage the stone finish you are trying to protect.
We have successfully welded the joint on the outside of the prong
It is now time to polish the prong and reset the opal.
The initial inspection of the pendant mounting revealed not only a missing prong on the opal, but also a very thin prong on the emerald next to the prong we replaced. In the next issue of BENCH, will discuss some possible ways to re-tip this prong.
Periodically I send emails showing pictures of jewelry that has been repaired using the laser. If you would be interested in seeing these pictures, you can email me at the address below. None of the email addresses I receive are sold or given to anyone else. If you currently receive these emails from me and would like to be removed from the list, please email me to let me know.
You assume all responsibility and risk for the use of the safety resources available on or through this web page. The International Gem Society LLC does not assume any liability for the materials, information and opinions provided on, or available through, this web page. No advice or information provided by this website shall create any warranty. Reliance on such advice, information or the content of this web page is solely at your own risk, including without limitation any safety guidelines, resources or precautions, or any other information related to safety that may be available on or through this web page. The International Gem Society LLC disclaims any liability for injury, death or damages resulting from the use thereof.
The All-In-One Jewelry Making Solution At Your Fingertips
When you join the Ganoksin community, you get the tools you need to take your work to the next level.
Trusted Jewelry Making Information & Techniques
Sign up to receive the latest articles, techniques, and inspirations with our free newsletter.
