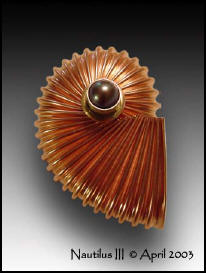

The Metal Corrugation Project
The act of contraction into repetitive wrinkles or alternate ridges and grooves. When studying nature forms, corrugation is regularly seen adding innate strength to what might be otherwise considered a frail form. Corrugation has been adopted by industry and used in utilitarian fashion for the manufacture of common objects we regularly see such as packaging materials as well as industrial applications such as roofing, siding, and drainage pipes.
4 Minute Read
Corrugation is the act of contraction into repetitive wrinkles or alternate ridges and grooves. When studying nature forms, corrugation is regularly seen adding innate strength to what might be otherwise considered a frail form. Corrugation has been adopted by industry and used in utilitarian fashion for the manufacture of common objects we regularly see such as packaging materials as well as industrial applications such as roofing, siding, and drainage pipes.
Metal Corrugation
Metal corrugation is a unique roll-formed process whereby a precise and specific repetitive surface pattern is achieved when processing thin gauge annealed 36 - 24 sheet metal or wire. Metal is processed using special tools manufactured with corresponding matching and enmeshing fluted gears that are aligned in such a manner so that the crest of one roller fills the trough of the other. Metal corrugation is a unique process NOT to be confused with the fold-forming techniques studied and highly developed by Charles Lewton-Brain.
In creating this sea form, you will discover and use both the strong and fragile properties of corrugation.
You will need:
- An armature base for forming such as a ring or bezel mandrel, or simply several sizes of round dowels ranging any where from .25″ to .75″ in diameter and 12″ long.
- Annealed 3″ x 10″ strip of 32, 33 or 34 gauge copper or fine silver is best suited for this project.
- Heavy-duty scissors or shears can be used to cut this thin metal.
- Bonny Doon Corrugation tool or Industrial Tube Wringer 401 with opening to accommodate the width of the metal to be processed.
DO NOT FOLD your metal when using the patterns shown. Patterns are drawn half size only to conserve space. Trace one half of the pattern on your metal, flip the pattern over to then trace the other half.
Trace then cut out the pattern(s) of your choice. Note that they can be photocopied for a larger sized form. Trace the pattern onto your metal, flip the pattern over aligning the straight line and trace the other half. Cut out your metal and corrugate using the wide edge as the leading edge. Don't fold your metal to achieve this.
You assume all responsibility and risk for the use of the safety resources available on or through this web page. The International Gem Society LLC does not assume any liability for the materials, information and opinions provided on, or available through, this web page. No advice or information provided by this website shall create any warranty. Reliance on such advice, information or the content of this web page is solely at your own risk, including without limitation any safety guidelines, resources or precautions, or any other information related to safety that may be available on or through this web page. The International Gem Society LLC disclaims any liability for injury, death or damages resulting from the use thereof.
Related Articles
Scoring and Bending Procedures
Steps on Making a T-Fold Boat Fold
Steps on Making a Rolled Fold Heistad Cup
The Jewelry of Cynthia Eid
The All-In-One Jewelry Making Solution At Your Fingertips
When you join the Ganoksin community, you get the tools you need to take your work to the next level.
Trusted Jewelry Making Information & Techniques
Sign up to receive the latest articles, techniques, and inspirations with our free newsletter.