Reflective Objects Photography
Reflective surfaces are a special case. I remember seeing an Art in America magazine once, and on the cover was a picture of some really famous sculptor's work in a Washington, DC gallery. It was a large, bulbous, bronze casting. It was highly polished, and what was really funny was that there on the cover of Art in America magazine was a picture of the sculpture.
8 Minute Read
In this article Charles Lewton-Brain describes how to successfully do reflective objects photography including suggestions and tips on properly positioning objects.
Reflective Objects
Reflective surfaces are a special case. I remember seeing an Art in America magazine once, and on the cover was a picture of some really famous sculptor's work in a Washington, DC gallery. It was a large, bulbous, bronze casting. It was highly polished, and what was really funny was that there on the cover of Art in America magazine was a picture of the sculpture, and on its surface was the photographer, the tripod, the lights, the man lying on the floor holding a large white fill card: everything in the gallery.
My first thought was "These people missed this. The photographer missed it, the editors missed it, the picture selector missed it, and here it is." Reflective surfaces give you yourself back in the picture and bring the world onto the object, bring the surroundings into the image taken, which can be a real problem - it usually doesn't look good at all. Reflective surfaces tend to bring in the colors around them, which in the photo - booth as I've described it means that you get a lot of black reflections, so it looks really bad. One generally arranges to have white fill cards placed everywhere that is reflecting black to the camera until the object appears white through the viewfinder. You subtract the black reflections by using judiciously placed white reflectors until the image looks good.
One professional photographer I met, when asked by a jeweller, "So how should I make pieces best for good photographs?" said "Don't polish them." Well, real life is that we have to deal with polished objects. There are several ways of approaching this.
If you have a reflective silvery surface and it has black reflections in it you end up with a very muddy picture which has a low tonal contrast between object and background, and it really doesn't work. Hanson suggests that, instead of getting upset with the black reflections as a negative problem, you view them as a positive solution and, as described above, replace them with reflections that you actually want (usually white; rarely colored cloth or paper etc.) which to my mind is a nice way of looking at the problem.
Tents
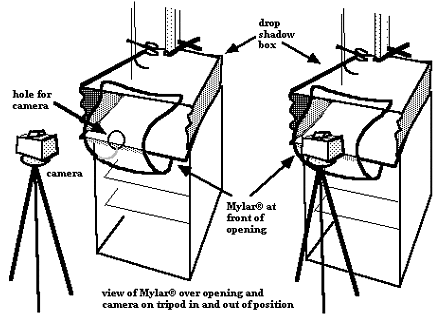
The usual way of dealing with reflective objects is to shoot the object inside a translucent tent. If you have a copy stand (which is how I used to photograph most of my work when I started out) you can use it to create a vertically - oriented tent. Otherwise one constructs a situation where the object is surrounded by translucent diffusing material (Mylar©) so that no surface facing the camera is able to reflect anything except translucent or white material. One may put a large sheet of translucent material clothespinned in place over the front of the photo - booth with the camera stuck through a hole in it or a large stiff piece of white paper, card or Foam - Core© which works in the same way. The whole point is that the camera cannot see any reflections on the object from the world outside the tent. This means that we don't care about the back half of the reflective piece: only what the camera sees counts.
Another way is to take a large piece of Mylar©, and hang it over a fishing line, rod or bar and place the object inside. The more transparent the supporting part is the better: best of all is to support the Mylar© from its center with a fishing line slung over the horizontal strut above the shooting surface. Then from all sides there will be nice diffuse light, lovely white surfaces. From the front, I will still be getting the camera, and me, and all of the front of the room that the object can reflect from, and so what we do is take a large piece of white cardboard or Foam - Core©, cut a hole in the middle to stick the camera lens through so that the camera's on the back of the white card with the hole and then take the picture. In this way there will be no reflections on the object that you don't want.
You want, if possible, all of the reflections on the object to be from white, translucent, or very diffusely lit surfaces. Fill cards of various shapes and pieces of translucent Mylar© all serve to replace reflections you don't want with white, neutral ones. Sometimes when shooting silver reflective geometric objects in a good light tent it can be difficult to discern the edges and corners of the object. Meltzer takes thin black paper strips and tapes them to the inside of the light tent so that they line up perfectly at the edges of the object thus defining the objects corners in a 'natural' manner for the shot. A curving black strip reflection in a rounded object may also be useful sometimes (Meltzer, p 62).
Sometimes when using a tent and a white card on the front of the camera you will see the camera lens itself as a round or oval black reflection in the object. In that case slowly raise the camera on its central cranking column. Look through the lens as you do this and at a certain point the black reflection will slide out of view. At that point tighten the camera into position and take the shot.
Copy Stands
Copy stands also provide a way of dealing with reflective objects. They offer a very controllable (and hence repeatable) system for taking slides of your work. For flatter items, coins and much jewelry a copy stand is a good solution as a photo - booth system. As described before there are horizontal and vertical systems. What follows deals with a vertical system.
You can mount the camera looking straight down and create a bag around the object suspended from the camera itself so that the entire interior space is within a tent. Make sure that you fold the bag so that by releasing a single clamp (clothespin) you can quickly get a hole that is big enough to reach into and arrange the object for the shot. Note if you use a vertical set - up with a dark background cloth (black velvet) under the work that dust and any dandruff can become a real issue.
When I first started out I used a pillow case; I would have the camera inside the bag, and I would point it straight down and take a picture. I would have the lights fairly close in, but I no longer recommend this approach with a pillow case, because regular cloth is laundered, and commercial laundry soaps have what's called bluing in them. Bluing is a material that fluoresces blue under normal lighting conditions. If you have a surface that is emitting a blue light, then that eliminates any yellow light that you would otherwise see.
What this means is that your sheets are actually yellowish, but the bluing in them fluorescing blue eliminates the yellow, and so they appear white to us - but perhaps not to the film and camera. Instead, use white, ripstop nylon which you can buy at climbing and camping stores. This is a neutral material, it can easily be made into a bag for a vertical copy stand or stretched over frames to produce diffusion screens, and professionals really like it. It's easy to work with, inexpensive and apparently doesn't adversely affect the colors that the film records.
It is possible to make your own copy stand. I did at one point. I think my recommendation is to buy one; shop at auctions, call up print shops, printmakers, anyone who records flat items photographically and ask them if they know of any used ones. They come up regularly in my local government surplus auction center.
Dusting (Dulling) Sprays
Sometimes professional photographers will use dusting sprays (also called dulling sprays) as a way of dealing with reflective objects. I don't use them myself but it might be a solution to a problem you have at some point. Dusting sprays are fine, light - colored powders in a spray can and can be bought at professional camera suppliers. I've heard of people using Arid Extra Dry© Deodorant powder in a spray can the same way. You take a highly reflective object and give it a very light coating of a fine dust, almost like the misted effect of breathing on a metal surface when it is cool and your breath condenses on it. This eliminates reflections. Then you can take the picture. Note that you don't want to make a mess or damage an object with a dulling spray so you should proceed with caution when using them. Collins only uses them on silver - colored reflective fill cards to alter the degree of reflected fill light and does not use them on objects (Collins, p 187).
When people are working with a reflective object using a dusting spray, quite often they will put the dusting spray onto the object, and then add a white 'reflection' where they think light streaks should be to describe the object to the viewer ("okay, to describe this thing, we need a white spot here and a white stripe here and a white stripe there"). One takes one's finger and wipes the dust away in a swipe where the 'reflection' should be. Then a white card is placed such that it reflects in the wiped areas, and now there are white light streaks 'where they should be' to describe the form on this less than reflective surface.
Some photographers will 'paint with light' by choosing a long exposure and hand - holding a suitable tungsten light source (I think one might be able to use a halogen flashlight - I'll have to try that sometime) while moving it rapidly back and forth or up and down to create a light streak line that follows the form of the object thus describing it in space better. I've done this once or twice but think it would work best on exposures longer than a second. Therefore, because most of the exposure times in our photo - booth are close to that, this method may not be immediately useful to you. Remember it though: it may sometime be a correct solution to a problem for you.
You assume all responsibility and risk for the use of the safety resources available on or through this web page. The International Gem Society LLC does not assume any liability for the materials, information and opinions provided on, or available through, this web page. No advice or information provided by this website shall create any warranty. Reliance on such advice, information or the content of this web page is solely at your own risk, including without limitation any safety guidelines, resources or precautions, or any other information related to safety that may be available on or through this web page. The International Gem Society LLC disclaims any liability for injury, death or damages resulting from the use thereof.
Charles Lewton-Brain
Master goldsmith Charles Lewton-Brain trained, studied and worked in Germany, Canada and the United States to learn the skills he uses. Charles Lewton-Brain is one of the original creators of Ganoksin.
The All-In-One Jewelry Making Solution At Your Fingertips
When you join the Ganoksin community, you get the tools you need to take your work to the next level.
Trusted Jewelry Making Information & Techniques
Sign up to receive the latest articles, techniques, and inspirations with our free newsletter.


